WinSCP is a tool to securely copy files from your computer to your webspace. It uses the SFTP protocol, which encrypts your data as it is sent over the Internet. This makes it more secure than traditional ways of copying data to a web site.
This guide should help you get WinSCP configured so that you can begin putting files on your website. It assumes that you already have WinSCP installed, but have not yet configured it to connect to your site.
There is a good site here describing how to install WinSCP
You will need four things to configured WinSCP:
If someone set up your web space and domain name for you, they should be able to tell you your user name and password. If you have lost them, you should contact whomever your are paying for webspace.
When you open WinSCP you will see a screen like this.
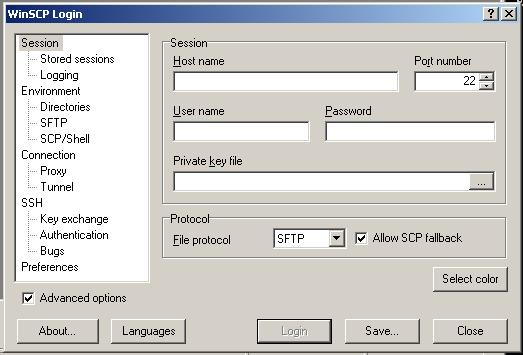
Enter the name of your website into the field labeled "Host name" and your user name into the field labeled "User name". Carefully type your password into the field labeled "Password".
You should not need to change the other settings. The "Port number" should be "22". The "File protocol" should be "SFTP" and the "Allow SCP fallback" should be checked.
Click on the Save... button to save your information. WinSCP will then give you a warning about saving passwords. Please read this warning. With your user name and password saved on your computer, anyone who has access to your computer can upload, download, and erase any of your website.
If you do not want to take this risk, press the Cancel button and erase your password from the "Password" field. Then press the Save... button again.
If you don't care about saving your password, press the Ok button.
WinSCP will now ask you to name your session. The default is probably fine, but you can change it to a more descriptive name if you wish.

You will now see a screen with your saved sessions.

Double click on the session you just created.
If this is the first time you have connected to this server (which it probably is if you're reading this guide), you will see a warning dialog.

This is normal on the first connection, despite the scary warning message. WinSCP is just telling you that it has never seen this server before, and therefore it isn't sure its the right one.
If you see this message for the same server again at a later date, this could indicate that something is amiss. Someone may have tricked your computer into thinking that another server is the one you're looking for. You can contact your system administrator with the "key fingerprint" given in this message if you ever want to be sure. In this case, you will want to press the Cancel button and contact your system administrator.
To continue connecting, press the Yes button.
Again, if this is your first time to connect to this server, this is normal, and you may safely press the Yes button.
Now WinSCP will connect to the server. If you did not save the password in Step 2, it will now ask for it.

If you did not correctly type your password when you saved it, then it will also ask for your password again.
If everything went correctly, you will now be connected to your web site!

In the left pane are the files on your computer. In the right pane are the files on your website.
Copying files between the two is very easy: Just highlight the files you want to move and drag them over. You can move entire folders back and forth as well as single files.
At the bottom of the screen you will see a few buttons you can use to perform other actions on the files, such as rename or delete. You can also right click on files in either pane to get a set of actions.
Good luck and have fun using your website!
The second time you connect to your server, you won't have to do all this work. You may simply double click on your saved session as in Step 4. If you saved your password in your session, then you'll be taken straight to your files!
If you installed WinSCP and selected the "Windows Explorer" interface instead of the "Norton Commander" interface, your screens will look different. I personally prefer the "Norton Commander" interface. To switch between the two, click on the Options menu at the top of the screen.

You should then select Preferences.... This will bring up a screen where you can change the settings of WinSCP. Select the Interface option on the left side of the screen and you will see a way to toggle the appearance of WinSCP.
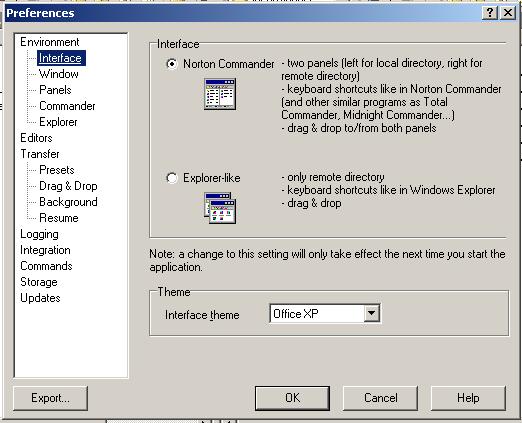
Press the Ok button to save changes. These will take effect the next time you start WinSCP.